Sunday, July 27, 2008

Double Header: Part II, Playing In The Street

Last night I had a great time shooting engagement pictures for a couple who are getting married next April. We all headed out for Downtown to get some fun stuff. I had come up with an idea a few days ago that I wanted to do. I wanted the couple in the street kissing at night. The only problem is how do you light people in the street at night with traffic that you can't stop? It's not as hard as you think.


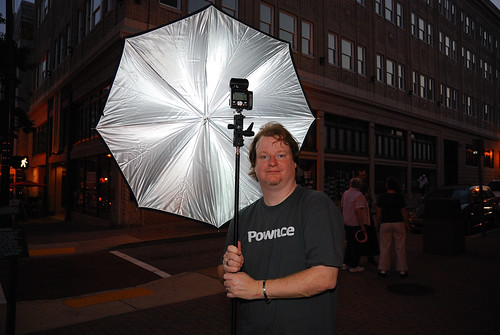
I know when I am in over my head and need help. My lovely wife came along for fun, and to help carry gear (And yes I know I am lucky. i have a great wife.). My friend Kevin came along to play the role of VAL. So I got out an SB800 popped that bad boy on a light stand with a reflective 45" umbrella. Handed it off to the VAL to hold out over the couple from behind me. Instant mobile boom! Thanks Kevin.


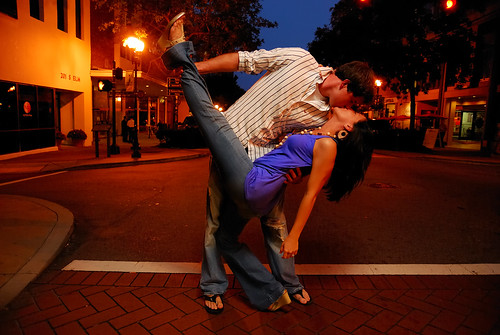
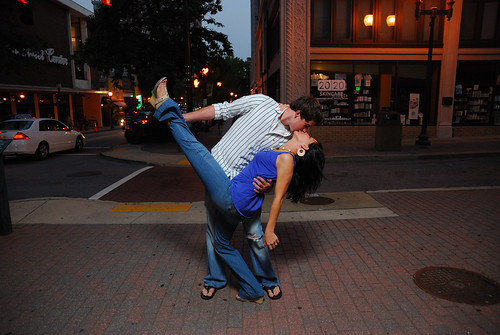
Now we all had to practice our choreography to run out into the cross walk when traffic stopped. I had the couple strike a pose on the sidewalk a few times until we got one we liked. this also gave me a chance to check the lighting setup. Kevin Behind me with the light stand/ umbrella combo boomed over head. I had the setup in TTL just to make life simple. A couple of frames, and the world is happy. The image looked good, TTL worked flawless for 5 or 6 frames. Upon looking at the image the couple just seemed to not match the environment of the street. They were lit with too much white light in my opinion. So i popped on 1/2 CTO and left the WB to flash. This was totally a choice made on the feel I wanted. A full CTO and the would have matched the street lights. I could have then adjusted the WB to tungsten to bring everything to the same color. But you know, I like the warm skin tones against the blue sky. I also like the orange glow of the street lamps. I know not everyone likes it, but it's my picture!


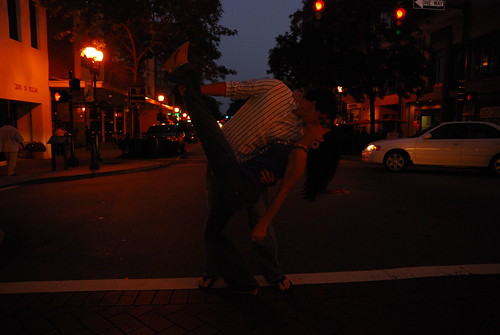
So the light changes and we are off into the street. By this point in time we have drawn a bit of a crowd, and the eye of a weary cop. Places, pose, frame one flashes fire wait on the recycle beep, frame two flashes fire wait on the recycle beep, frame three flashes fire wait on the recycle beep, we move out of the street. Check the images.....$%&@$ TTL. Three frames all under exposed. The flash fired on everyone, recycled, and I have no idea. I don't care really. I just go over to manual on the flashes chimp a couple of frames get the flash power set. I end up at 1/16 at f/2.8 ISO400. I then adjust my shutter speed a little since we have lost some more daylight at this point. So into the street. Golden! We do a few more takes, and call it a night.

I made a post in the Strobist group on Flickr talking a little about this shot. There have been some questions lately in Strobist and other groups asking if you can take a good portrait with only one flash. I hope this helps to show you just have to make it happen.

Double Header: Part I, What's Up With My Meter?

I received a Flickr mail from a reader asking a question that I get often enough that it deserves a public response. The question is basically as follows.

When I put my flash on my camera, or have my pop-up flash up in commander mode, or have my SU800 in the hotshoe my exposure meter still says I am way underexposed. What am I doing wrong?


The answer.....Nothing.

This is really pretty simple. Your camera does in fact have a light meter built into it. It is a reflective meter though. Meaning it can only measure the light which it currently can see through the lens. Your flash units are not firing therefore there is no light for the camera to measure. Now comes the follow up question.

But I am using TTL and the camera knows how much power to send to the flash unit. So why can't my meter show that?


The camera does in fact figure out the flash intensity for you. But to understand why your meter can not show this you have to understand how TTL works. So here is a basic break down.

1) You press the shutter.
2) The camera fires a TTL preflash. Meaning it flashes before the shutter opens. This preflash is a known strength. I don't know what that strength is, but for the example let's just say it is 1/16 power.
3) The camera's meter is timed to read this preflash at the exact moment it fires through the lens (Hence the name TTL).
4) Depending on distance and modifiers the light hitting the subject will be a given strength. Your subject may be underexposed or over exposed depending on that factor plus.....
5) Your camera's aperture and ISO settings determine how much of that light reflecting off of your subject reaches your camera's sensor.
6) At this point the camera does some basic math. It says, "I know the preflash was 1/16 the image I now see is under exposed by 2 stops (just an example here). so I need to make the flash power 1/4 to properly expose the subject.
7) The camera then fires the remote flash at 1/4 timed when the shutter opens.

OK, John what does that have to do with the price of eggrolls? Well, your camera only knows all of those variables once you commence the shutter release process, and make an exposure. The camera's meter has no way to know flash distance or modifiers being used until you snap the picture. If you are in manual mode the camera has no idea what your remote flashes are set to power wise on top of the other unknowns.

So what do I do you ask?

Use your meter to set your ambient light levels where you want them. Nothing new here, basic exposure 101. Then set your flash power to properly expose for your subject or let TTL take over if you trust it.

But John, that's the whole point.....How do i know what is a correct flash power?

Practice and learn. You can use charts. But practice makes perfect. Be methodical in making sure you know that if you move that flash twice as far back you know what happens. David Hobby talks about making a cheat sheet for your flash units over on the Strobist Blog.

Thursday, July 24, 2008

Lighting a Tent with CLS


SB-800 Tutorial 1
Originally uploaded by image-y.com
Pretty cool stuff from Flickr user image-y.com. He has a cool tutorial going on on his blog at: http://image-y.com/blog/personal/lighting-a-tent-with-an-sb-800-tutorial/

Check it out. many props on some way cool images!

Thursday, July 17, 2008

One Light, One Umbrella


Sorry for the delay in posting. I have been busy doing some weddings, and well generally slack about attending to my blog. So I will use a wedding shot as a simple example. Nothing fancy, and pretty basic for those of us with some lighting stuff under our belts.

So this is simply one SB600 in a shoot through 43 inch umbrella on the camera's left in TTL. I am right up against and slightly under the umbrella. The umbrella has a little down angle on it. Nothing hard right?

A couple of observations here. First the notorious under exposure in TTL issue happened here. I had to bring it up in post. And before you ask no the flash wasn't firing on full power. It is just something about shooting through an umbrella that CLS in TTL just doesn't like. Second. I should have feathered the light from the top. There was too much spill going over the bride at the piano. I had to clean it up in post to bring it to black. I am now thinking that I should have used my convertible umbrella and used the black cover over the top half to block the spill. Lesson learned for next time. It goes in the mental reserve. Maybe I will remember to check there next time!

On a completely different note I have thoroughly enjoyed reading Zack Arias' 5 part tutorial on high key shooting on white seamless paper. It is a great read, and really gets you thinking about how well do you control your light. I could be better. i am sloppy at times, light going everywhere. Got to control the light!

Moral of this post...Control the light.

Monday, July 7, 2008

One Strobe and 5 Minutes

Weddings are fast. They move quick during the ceremony, but everything is on a time table. The squeeze, at least for me,comes between the ceremony and reception. In that brief little window you have to shoot the formal portraits, and it is most likely the only time you have the bride and groom together in the church for pictures. So you have to knock out the standard traditional stuff, and some creative stuff, and then if you have time try your new ideas.

Such is the case in the above image. I had taken all the portraits and the "safe" bride and groom shots. But I had an idea for a shot. I asked the bride to do a couple more shots and the response was, "OK, but you only have 5 minutes." No pressure right? New idea, start with what I know.....

I could not back light the windows, not enough strobes and no pocket wizards anyways. So they are lit with pure ambient light from outside at 6:30PM on a cloudy over cast day, not the best but it gave me 1/100 at f/4.5 ISO 100. Now no time for stands. I hand a SB600 set to remote to my VAL (Voice Activated Lightstand). Triggering the SB600 was my on camera SB800. The SB600 was set to TTL. At first we started with the strobe to camera right with the zoom out to 24mm. I new I did not want a lot of light everywhere, but I honestly had a moment of not trusting the strobe to make enough light. So I started wide, and man that little strobe lit the whole place up, sloppy. So I zoomed the strobe head 85mm (as much as the SB600 has) and fired again. Better but the shadows were all wrong. I had the VAL switch to camera left, hold the strobe up, and angle it down some. Let me add a note here: One thing I like to do is turn the flash head vertical when using no modifier to match the upright subject. I picked that little tip up from Don at Lighting Essentials. Don is full of great little tips, and is a real pro with this light stuff you know.

So back to the image. VAL camera left, unmodified SB600 zoomed to 85mm vertical on TTL. Click goes the shutter, and we are done. I would love to say that the image you see was exactly what was on camera, but no. I still had to much spill to the back of the church lighting up some of the walls. I also had stray light hitting the hanging fixtures. I needed a grid for the strobe and I didn't have it; those Honl units are looking mighty nice now. However, I did have the essence of the image, and honestly making things black in post processing is easy. So wrapped it in under five minutes with three frames.

And rest assured this type of shot will get refined at the next church wedding I shoot.

I also would like to ask for a moment of silence as one of my SB600's gave it's life during this wedding. It met a tragic and unneeded end due to an unsecured light stand and wind. It will be sorely missed.

Friday, July 4, 2008

CLS Position Limitations

A recent question by a new comer to the Flickr Nikon CLS group has me visiting an oldie but goody, CLS position limitations. We all have had people tell us, "CLS is only works if you have an unobstructed line of sight." or "CLS will not work if you can not see the remote flash." So I say yes and no. Let's define a little better what CLS really needs.

1) Line of sight- This is not really accurate. What it should say is CLS needs to See the light. The remote strobes only need to see the light from the commanding unit. Remember light bounces, and as such we can manipulate that.

2) It doesn't work outdoors in sunlight- Uh, no there have been many tests by members of the CLS Group which show otherwise. There are fewer things for the commanding unit's light to bounce off of. So you just have to compensate and be aware of.

What do you do then? Use whatever you can to bounce the commanding flash to your remote strobes. Examples of things to use: Walls, Mirrors, Mini-Mirrored Disco balls (You know who you are), Ceilings, Car Doors, White T-shirts, and on, and on, and on.

The above shot was shot with my D80, pop-up as commander, directly in the front center of a 43" shoot through umbrella (poor mans ring flash) with a SB600 on 1/2. I was about 5 foot from the wall. The opposite wall from the model was at least 25 feet behind the camera and painted black, the ceiling was also black but pretty low. The SB600 fired every time behind the camera through an umbrella. So yes it can be done. If I would have had a problem I could have used a small mirror to bounce the flash back over the camera. But the light colored wall worked well enough.

Tuesday, July 1, 2008

Sexxxyyy......

A little late on the announcement, but seeing as how Nikon did not send me one to test I figure the news breaking is best left to those who are "in the know" a little more then me. The new SB900 has all the bells and whistles anyone could want. Here are a couple of links to the reviews:

David Hobby at Strobist:

SB900 Release a'la Strobist style

Joe McNally's Blog has some nice examples of Joe putting his daughter and her friend in front of the SB900. Joe is the first to get to play with the new strobe, and will be having more images shortly.

SB900 Joe McNally Style!