 I argue, and push, and reiterate at least 10 times per week to others that CLS does not mean TTL. It is not a set it and forget it system unless you make it that way. You have to use the best tool you have. The one on your neck.
To folks who are new to the world of flash and off camera flash the thought of having to figure out flash power, f/stops, and just how the crap does one balance flash with the ambient are all overwhelming thoughts. Ah, then here comes CLS with promises of TTL so we don't have to think. So bang set it to remote, point it at the subject and you let the camera take over. And less then desired results ensue, much like a lot of auto modes. So how do we get folks who are shooting full bore TTL to take the first steps to learning how to control their light? Enter the friendly variables of EV Comp and the TTL settings in your commander menu.
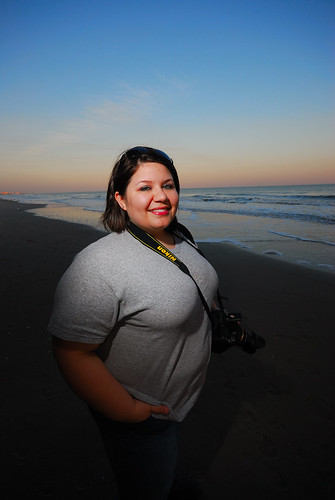
So let's take a look at the above image of my lovely wife who will kill me when she sees this on the net. This was shot on a relatively bright beach later in the day heading into sunset. I set my camera to A (aperture priority) to let the camera figure out my exposure. Let me add here I generally have Auto ISO set to OFF. I set the metering mode to matrix. This is an important step. If I had been set to spot or center the camera would expose for my wife's nice midtone shirt. The result would be a blown out sky. So I took a test shot. The camera was still trying to expose somewhat for my wife resulting in a slightly blown out sky. I dial in -1.3 EV comp simply by pressing the +/- button and turning the dial. The result was a dark beach, dark wife, and a nicely rendered sky. With my ambient set to where I like we can now deal with lighting the subject. I had one SB600, no modifiers, no gels set to remote group A channel 1 hand held camera left. I set my D80's pop-up flash to commander mode. In the commander menu I set my pop-up flash to not contribute by setting the mode to the two dash mark "--". I then set group A to TTL. The next setting was to set the TTL compensation. This is important because setting the EV Comp to -1.3 overrides flash power settings. If I left TTL with the compensation set to 0 in the commander menu the result would be an underexposed subject. That's just the way Nikon did it, accept it, live with it, embrace it, curse it only in secret away from your camera. So I set the TTL compensation to the inverse which is +1.3. Result, properly lit subject. The last step in this picture was to zoom the flash head in some. I don't remember exactly but it was some where around 50mm probably. Why? Well I did not want her legs to be lit which keeps your attention on her face. Control your light!
This is not as complicated nor is it time consuming to set up. And the beauty of it is the flexibility it gives us. If I had been shooting portraits on this beach or models I would be changing my flash power, aperture, and shutter speed trying to keep everything in check. With this type of setup I could have shot for 30-45 minutes under ever changing lighting conditions without ever touching a setting, and just focusing on my subject and composition. So long as I wanted this type of look. I know the die hard full manual folks will still not want to do this, and that is fine. Just remember it is one more tool. Even the most experienced shooters using this system over full manual could squeeze a few more frames out during the shoot. And to everyone shooting TTL scared of the manual world. Look at this as a stepping stone towards learning how to control your light, and make it work for you. Take the concept, extrapolate, and repeat.


6 comments:
It is a welcome blog.
Thank you for the initiative.
First post is really good.
Lovely photo of your wife.
All the best to the blog,
and you and your family.
Thanks/PhotoKeld
Thanks for sharing your experience and knowledge.
Can you tell me the "Optimize Image" settings you used for that picture? The colors are wonderful!
Thanks again.
Thanks for undetaking this,John! I'm looking forward to the lessons,and learning all I can from you!
@David-
I use a the custom profile. Colorspace is III sRGB, sharpening +1, Saturation was +1, no hue adjustments. I use Capture NX, and depending on the shot I will use the color booster (Check the protect skins tones box on portraits) or just bump up the saturation via control points.
An easier way to get your shot:
1. I'll go your way with Aperture priority, so choose your aperture.
2. Spot meter the sky and have the camera select an appropriate shutter speed. Lock in the exposure with the AE-L button.
3. Turn back to your subject and compose the shot. Use FV Lock to get an accurate iTTL flash read and prevent the subject from blinking.
4. Take the shot, and fine-tune the settings from there.
You can even skip step 3 (FV lock) if you have enough faith in iTTL.
I appreciate what you're saying, but the one thing that's missing is that as the sun disappears over the horizon you'll need to change your EV compensation to match (but the manual shooters would have to stop up or lower their shutter speeds, too).
@Andrew- That would work also...However, If you are working with a model or just a regular old portrait session that is a lot of pointing at the sky to get your exposure instead of pointing at the subject. Also you said "fine tune the settings from there" Well to fine tune in A mode you are back to dialing in EV comp which is where I started.
Post a Comment